Wednesday, 7 August 2013

T-Glase Tiki

I am lucky enough to have a small amount of the new Taulman3D T-Glase (pronounced Glass) which I have been trialling on the UP Plus.
PLA settings are too cool for good adhesion, but with the use of the temperature reducing patch lead (250C) I got great results. This materail prints really easy, with no stringing and almost no warp. It is super clear and when the light catches it it gives an almost mirror like reflection. It also has great strength.

Here are a couple examples.


I really do love shiny things!

Thursday, 1 August 2013

I'm all for PC!

I'm working on my own hot end design and today I got around to testing some polycarbonate. I had tried printing this previously at 260C and although it would extrude the layers just didn't bond very well. With the all metal hot end, I tried again at 290C. I was very happy to see this time the layers stuck together, in fact it is quite strong given it is only one layer. Although I think, surprisingly, the best attribute to PC is the amazing silver like shine it has, unfortunately somewhat lost in this photo. It is also very transparent, even more so than clear ABS or PLA.


Thursday, 25 July 2013

Enclosure Vs no enclosure.

I recently did a print for a potential customer on my new UP Plus which doesn't have an enclosure. There is quite a striking difference, which I thought I would show.

The ambient temperature on the first print was around 16 C. The enclosure temperature was approximately 40C. Other than that both prints were identical in setup.

I think it is pretty evident which one is which!


Sunday, 21 July 2013

Soft PLA

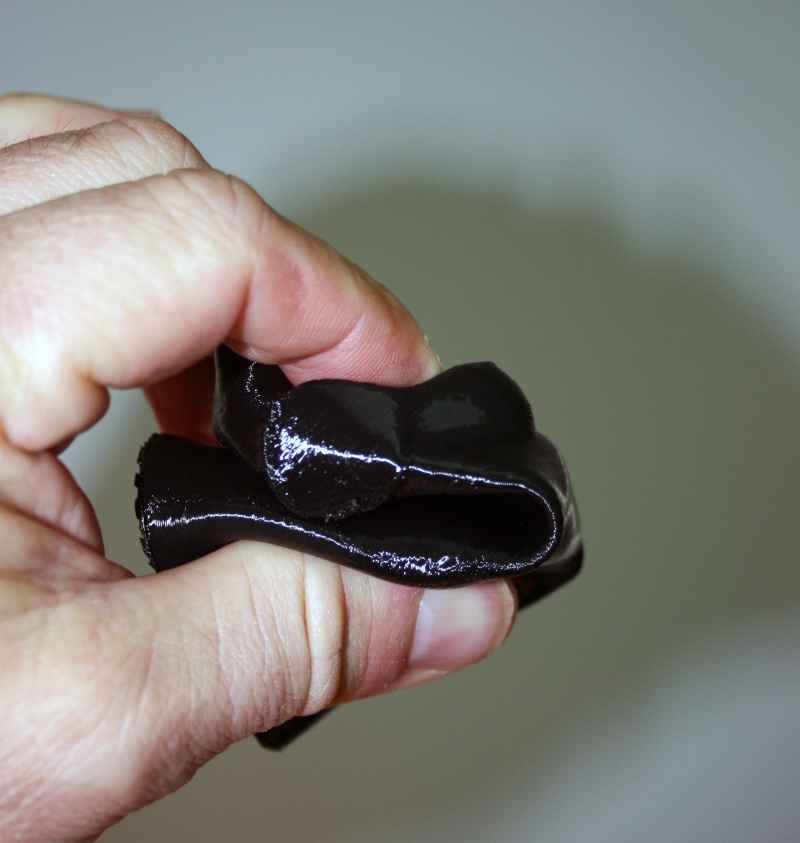
Over the months I have been searching for a rubber filament, without much luck. I had tried a couple but they proved very difficult to extrude due to being too soft.

I recently got some soft PLA to try, and to my delight it printed quite well on the UP and Deltasine R3dback printer. The trick I found on the UP was to bump up the temperature to about 250C. At normal PLA temps the filament would buckle and stop extruding within minutes.

I didn't hold much hope of extruding it on the bowden system of the delta either, but found with the same temps and extruding nice and slow ( ~15mm/s) I could get consistent extrusion. Although the retracts need to be dialled back too.

Once extruded the end result is quite flexible, but not overly stretchy like rubber would be, but more like really flexible plastic. Its quite like the material my iphone cover is made from. I will hopefully post some pictures of an iphone case printed in soft PLA soon.

So, without further ado here are a few pictures of the Pink panther women (http://www.thingiverse.com/thing:1216) , printed in black soft PLA on the UP at .2mm. Printed as shell to maintain flexibility.


Soft PLA is available for sale in black and white in both 3mm and 1.75mm at
http://www.3dprintergear.com.au/category_s/1836.htm


Monday, 28 January 2013

Smooth as a babies.....

I'd taken a scan of my partner when she was pregnant, but only just got around to cleaning it up ready for printing on the weekend. She was 38 weeks at the time of scanning. Unfortunately the head didn't work very well at all, so had to settle for just the torso.

Here is the original piece straight off the printer.


And here after 2 hours in an acetone vapour bath.


Saturday, 5 January 2013

Smoothing

In an attempt to improve the finish of my models I have started experimenting with acetone vapour smoothing.

Stratasys offer a smoothing station for around $40,000 but I wanted something a little cheaper....

There are a few others on the net getting very good results with putting models in a cheap deep fryer or cooker and heating a small amount of acetone for a short period to vaporise the acetone and smooth the model.

Another option is to place the model in a sealed container with some acetone, and leave for a few hours. This method is the cheapest, but also the slowest.

A few things about acetone vapour. Firstly its rather toxic, so breathing it in is definitely not recommended. Its also explosive and evaporates at around 50C. And lastly it is around twice as heavy as air. This last point is somewhat of an issue with the passive smoothing method, as a part will smooth from the bottom up and so won't be even. On smaller models this doesn't really cause a problem, but when dealing with taller models I notice the bottom of the part looses more detail and can sometimes cause the part to warp or completely fall over, whilst layers are still visible at the top.

Ideally the vapour needs to be circulated around the part so as to get a good even covering. Something I'll work on in the future.

Another thing I noticed is that the part continues to smooth even after it has been removed from the container. I was quite happy with the result I had on a small figurine,so removed it from the container and left it on a bench to dry over night. In the morning I was shocked to find the part was far smoother than when I left it, and had lost much of the detail it showed the night before.

Now when a part is removed I put it into the freezer to halt any further smoothing.

Parts can vary on how long they need to stay in the vapour. depending on the size of the object and also the ABS. The dragon below for instance was left in for about 12 hours. Its relatively "soft" ABS, but the part was quite large. The terracotta warrior on the other hand was left in for just over 2 hours.


 Here you can clearly see the layers.

 This is the dragon after the smoothing vapour bath! The surface is as smooth as glass.
You can still just make out some layers, but these seem to be "underneath" and cannot be felt.

Another before ...
 And after


Sunday, 30 December 2012

Blatent macro shot

My macro lens arrived to day! So here is a close up of the Sapphos sculpture printed at .2 mm.  Even close up its not easy to make out the layers.


Friday, 28 December 2012

Printable spool for Laywoo-D3 filaments.

I designed this spool specifically for the Laywoo-D3 filaments. This one is actually printed in the Laywoo-D3 filament. Its a little bendy, and I suggest printing in either ABS or PLA.
I also designed this to be printable on an UP printer (140x140mm) and with no support.
Centre hub is 30mm in diameter. And the arms are adjustable to suit either 1.75mm or 3mm.


The STL can be downloaded here

More fun with wood!

Here is a Tiki statue printed in Laywoo-D3

I had support at 30% and it built a bit up at the front which left a few dags. Probably would have been fine at 10%.


Thursday, 27 December 2012

Laywoo-D3 and support

I was asked how Laywoo-D3 prints with support. At that stage I had stuck with mainly models that didn't require support, as I was also quite dubious about how easy support might be to remove. Or how stable it might be during building, as it is quite soft.

I had been printing some Sapphos statues recently and wondered how well it might print in Laywoo-D3.

So here is the result!

I used a flash with these pictures as it highlights the details far better. At least until my new macro lens arrives.


You can see the support around the base and under the chin. There is also a bit at the back of the head that is not shown. I have been printing in .15mm layers, but thought I would do this in .2mm. The layers are just visable.

Although the support was stuck on well, it did generally come away cleanly.


One issue is the lightening of the areas where support was removed. Although the flash makes it look much worse than it is. I found just wetting my finger and rubbing over the are seem to help. Perhaps a clear coat might be worth a try.

And here is one printed at .15mm in ABS as a comparison.


Friday, 21 December 2012

End of the world? Nah, just some really neat coasters!

Another print in Laywoo-D3 done on an UP.

Designed by Dizingof, a pair of Mayan coasters. Not sure if Mayans had coasters back then, but the symbols are genuine!

http://www.thingiverse.com/thing:38720

Still a little stringy, but I try to imagine its just cobwebs...


Thursday, 20 December 2012

New kapton tape, new price.

Just received our new shipment of 140mm wide kapton tape.
This lot is thicker than the first batch at .08mm, or just over 3 mil and due to a bulk purchase I have been able to reduce the price from $40 to $29 per 33M roll. That should yeild around 230 platform coverings at about 12.6c per cover.


Wednesday, 12 December 2012

Laywoo-D3 update

After a total of around 8 hours of printing with the Laywoo-D3 with no blockages I'm fairly confident that the .5mm nozzle has done the trick. Enlarging the UP nozzle also hasn't seemed to have had a detrimental effect on ABS or PLA printing either!

Something I have learned is this material really likes plenty of air. Very much like PLA in this regard. Otherwise it has a tendency to become quite stringy.


I printed the terracotta warrior again but with maximum fill. This gave a pleasing weight to it. Much more like a real piece of wood, more so than the previous hollow print. The other thing I discovered is that the layer bonding is excellent, and the parts, although they flex a little, are very hard to break.

This is a tornado I printed at .15mm. Its a little furry.


Sunday, 9 December 2012

Wooden Warrior!

Well being all out of terracotta.....

My first test a few weeks ago with Laywoo-D3 wasn't so succesful on the UP. The nozzle quickly became blocked after about 15 min. So I abandoned further prints until I could get hold of a .5mm nozzle. In the end I bought some .5mm drill bits and enlarged a spare nozzle I had. Stock size is .4mm I think.

So today I tried printing out a scan of a terracotta warrior I scanned with 123D catch a few months back. The print took around 1 hour 22 min, significantly longer than any other print I had tried. I printed at .15mm layers and minimum fill, to save wood. The 1.7mm wood is rather rare at the moment.

The fact it printed without any blockages is hopefully due to the larger nozzle, but I could have just got lucky. More printing will tell I guess. But I successfully swapped back to ABS without any issues.

The wood is quite stringy, as you can see between the feet, kinda like PLA, but what I love is the wood feel of the object. It really feels like a piece of wood. In this case cardboard, due to being almost hollow. Its quite soft too, but I think it will harden up in a day or so. Also note the layers are almost completely invisible!


Thursday, 6 December 2012

Nozzle too cold

There have been quite a few iterations of the "wind barrier" for the UP Plus printer, the latest of which is an adjustable flap to allow you to swap between air blowing over the print and not. The latest printers, so I am told, also have larger fans, which allow for even better cooling. Especially helpful during PLA printing.

Anyway, I've been occasionally getting "Nozzle too cold" errors when having the flap set to full open. It seems like the heater just can't keep up. So I thought I would try and do something to help insulate the element from the blowing air. What I have done is applied ( quite messily) high temperature silicone to the side and bottom of the heater element, but not the nozzle. I also applied it to the heater wires, that have a nasty tendency to break after a while, to help support them.

High temp silicone should be available at most auto parts stores.

So far so good! Even with the flap closed there is a small amount of air that escapes the barrier. This seemed enough to cool my hot end to about 98%. No problem really, its only when it gets to around 93 that it stops printing. So far the temp is reading 100% all the time, with or without the fan blowing on it. The other added benefit is that stray filament doesn't stick all over the heater making a nasty mess.


Thursday, 29 November 2012

Christmas star

A customer recently sent me a photo of a star he printed for their Christmas tree.

Santa should have no trouble finding his way to this tree!

Printed with Crysta-Line Topaz on a Solidoodle 2 printer.

The files for this can be found at http://www.thingiverse.com/thing:14846

The same customer also sent me a logo he printed. Its a beaker with blue "liquid".


Saturday, 24 November 2012

Lithonator....

Thought I might try something a little less "family" orientated.

You can download and print this yourself, although be warned, its a ~100mb file, so could take some slicing....

This was done at .15mm on an UP! (currently on special at $1499)

 http://www.thingiverse.com/thing:34491


Monday, 12 November 2012

Its Here! Photo to Mesh V3

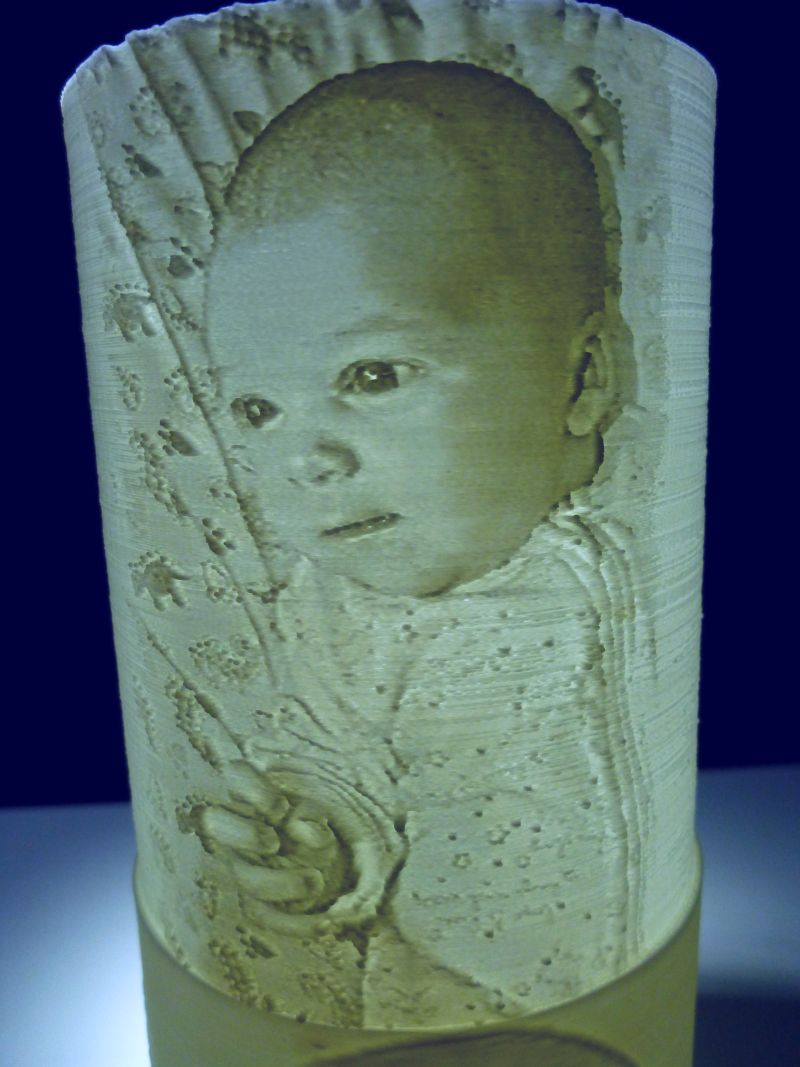
The new version of Photo to Mesh V3 is now here! What's so exciting you ask ? Well cylindrical lithophanes of course! Plus a host of other great new features.

Here are just a few examples of what I have printed over the last few days. All printed on an UP! printer at .15mm layer height.

This first one has 3 photos printed on the outside. Done by stitching 3 photos together then importing it as one new photo.


Lucky enough we just had our first baby boy just a few weeks ago, so I have the perfect subject.


A group shot.


Below is a print I made without any smoothing. I had falsely thought the printer wasn't capable of resolving the full detail, but I was stunned at just how good it could look. I now have to go back and print my earlier ones as they now look blurry in comparison.

Be one of the first to own a copy. You can get it HERE


Thanks Owen Ransen for all your hard work developing this great piece of software.

Monday, 5 November 2012

Lithophanes revisited

Something very exciting is about to happen in the lithophane world. Stay tuned....

Sunday, 28 October 2012

1.7mm Wood has arrived!

I was pretty excited to receive my 1.7mm wood sample the other day. It looks really good. very flexible, to the point it is quite difficult to snap, unlike ABS.

I quickly put it in the UP and extruded at 200C. All looked good for a while, as I attempted to print out the cyclonic shape I printed with the Crysta-Line filaments. Anyway, after about 10 minutes the extruder blocked. Damn. Although when cleaning I discovered the tip hadn't blocked but the tube above had! Not sure why, as this is 2mm wide. I later discovered that it is also reccomended to use a nozzle of .5mm. I have a spare which I will drill out ( the stock Up nozzle is .35mm) and try again.

One thing I found was that due to the texture of the wood layers almost disappear.

Here is a picture of what I managed to print out.